
Do I need to block my hand-knitted socks? Yes!
How do I block my hand-knitted socks? We’ve got you, read on!
How do I wash my hand-knitted socks? We’ll cover that, too!
If you’re asking any of the above questions, you’ve come to the right place!
Do I really need to block my socks?
While no one will be hauling you off to yarn prison if you don’t, it’s still a strong YES! from me.
Knitting socks isn’t for the faint of heart. If you’ve knit a pair or more of socks, then you’re a knitting bad-ass. I’m serious; I’ve been knitting for more than 25 years, and I didn’t feel like a true knitter until I had turned a heel (well, two heels, actually) and Kitchener’ed a pair of toes. How long does it take you to knit a pair? 8 hours? Maybe, if you’re superhuman. If you’re anything like me, it likely takes an hour or two here and there for a few weeks or more. So why skip this last step, especially when it can elevate your beautiful stitches from hand-made to artisanally hand-crafted?
What equipment do I need?
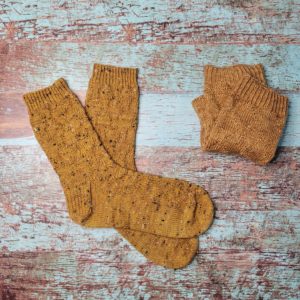
Hand-knit socks (one or more). If you’re blocking more than one pair, separate distinctly contrasting colorways. In my example, the colorways are similar, so I decided to block / wash them together.
A bowl. Nothing fancy here, just a mixing bowl out of my kitchen cabinet.
Wool wash. Some dyers and LYSes will throw in a sample of Soak or Eucalyn with larger yarn purchases, and I make it last as long as I can – just a few drops is all it takes for a bowlful of knits. I keep the opened envelope propped in a glass, open side up, and a little sample packet will last for several blocking endeavors. It’s just a few dollars to buy a small bottle, and it can last for years.
Sock blockers. After spending all my money on yarn and patterns, I tend to be a minimalist when it comes to blocking: I use a towel in lieu of fancy blocking mats; I don’t own blocking wires; I almost exclusively use free samples of wool wash; but I INSIST on sock blockers! In-freaking-sist on them. Seriously. Of course I have more to say (I’m wordy) about blockers, so be sure read to the end! (You can make your own out of cardboard if you’re not ready to commit yet.)
Come on already, just tell me how to block my socks! And what about washing? When? How?
I hear you, I’m rambling, so let’s get on with it. I wash my socks the same way that I block them so they look brand-new after every wash. I’ve had a few too many superwash-in-the-washing-machine attempts go wrong, so now I wash the way I knit: slowly and with intention. It is slow fashion, after all. Directions for the first blocking are just the same as for each washing, so read on.
How often do I have to wash my socks?

These socks have been worn repeatedly (I’d guess about a dozen times each) since I Kitchener’ed and blocked them initially. Wool has the wonderful properties of not holding odor and of bouncing back to its original shape (they won’t stretch out with just one wearing), so I don’t launder them often.
If you look closely, you can see that the cuff ribbing is a little stretched out and the stitch pattern has almost disappeared from the leg and top of the foot. They still smell fine and are perfectly wearable, but they’re a bit saggy on my ankles and no longer snugly hug my feet.
How to Block and Wash Your Socks
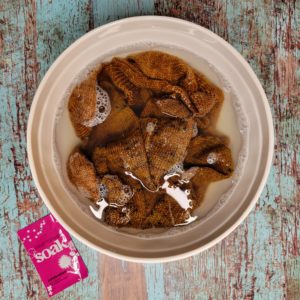
Step 1. A nice little Soak in a room-temperature bath. I just use the water as it comes out of my kitchen faucet; the temperature of your water is not very important, as long as it’s not hot to the touch. Fifteen minutes is plenty, but overnight won’t hurt either. I once blocked a shawl for three days because I completely forgot about it and it was no worse for the wear. (I’m also the kind of person who leaves laundry in the washing machine long enough that I need to wash it again.)
I use a few drops of a gentle wool wash, like Soak (we are not sponsored by or affiliated with Soak).
Step 2. Gently squeeze the excess water from each sock as you lift it out of its bath. Do not wring! Wringing distorts the stitches and makes the sock look wonky. Wonky is a highly technical knitting term for when things have gone awry.
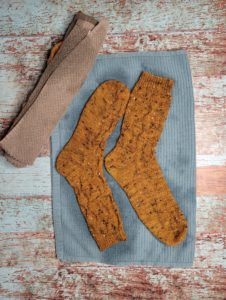
Step 3. Place the wet socks on a small towel and roll it up lightly like a Swiss cake roll, not tightly like a burrito. The towel will absorb a good amount of the water, and I like to give it a few squeezes to pull more moisture out of the socks before I handle them. Why? When you handle sopping wet knitting, the weight of the water can drastically stretch out the piece. Unroll the not-burrito and set the damp socks on a dry towel, shaping each into the approximate shape of a sock.
Step 4. Wait a bit. You’ll have to use your judgement here to decide how long to wait, as there are quite a few variables in play. The point of this downtime is to allow the socks to air dry from drenched to damp before placing them onto blockers, again to keep them from getting wonky. If you live in a dry climate, use forced hot air for heat, or your a/c is running stong, this will only take an episode or two of Friends. If you’re in the midst of a hot, humid summer (the perfect time for washing your socks!), you can relax for an afternoon binge of Bridgerton before moving on to the next step.
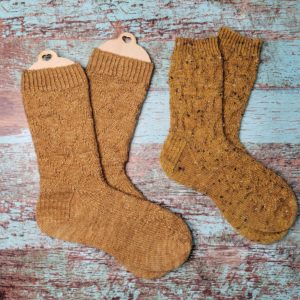 Step 5. Delicately pull each sock onto a blocker (or cardboard cutout of a blocker – see below). Take the extra time to painstakingly align the stitches and rounds, ensuring that they aren’t twisted, stretched out, or bunched up. Seriously, don’t rush through this part; it’s the most important step in the process, and the best defense against wonkiness.
Both pairs pictured here are on blockers; the socks on the right are a smaller size, and are on smaller and shorter blockers, which end below the ribbing. There’s no disadvantage to either setup, as long as the sock is not smaller than the blocker (that would stretch the stitches widthwise and wreck their elasticity).
Step 6. Let them dry. The little hollow hearts at the top of my wooden blockers are for hanging them up while blocking to get better airflow through the stitches. Humidity is the key player once again here. I’m in southern Florida in April as I write this, and it took two full days for mine to dry completely.
Step 7. Remove from blockers and get some fun pictures before they go back in your sock drawer!
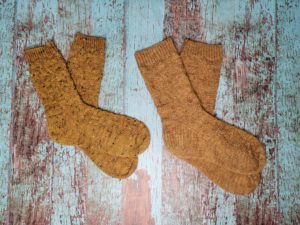
If you look closely now, you’ll see that the ribbing once again pulls in at the cuff, the stitches are tighter and smaller, the socks will once more stay up on your ankles, and the subtle Lattice stitch pattern is refreshed and clearly visible.
Details, Whatnots, and More
Knitting pattern is Lattice Socks by Melissa Kemmerer (me!), published in issue eleven : head over heels.
Indie dyed yarn is Olive & Two Ewe Tennyson (85% Blue-Faced Leicester, 15% nylon nep) in Copper (left), and Emma’s Yarn Beautifully Basic (100% superwash Merino) in Wish You Were Beer (right).
As promised, more about sock blockers:
The best results happen with quality products, but that’s not realistic or affordable for everyone. If you’ve used up all your knitting mojo on this pair of socks and will never knit another, or if you spent all your knitting budget on yarn, there’s a free alternative. You can cut your own blocker out of cardboard or foam, if you have it handy (we crafters tend to hoard responsibly store crafty things, so it’s entirely possible that you might have a piece of foam handy) – there are even pdfs you can download to print and trace them (do a quick Google search). While they won’t likely hold up through more than a handful of uses and may end up soggy in a humid climate, a DIY set could be your gateway to a new stash of decorative blockers, a step on the ladder to becoming a life-long sock knitter. On the other hand, if your needles are never, ever, ever getting back together with another pair of socks, this is a perfect one-and-done solution.
I love my sock blockers from Twin Mommy Creations; they’re light, cute, and have a little heart cutout at the top so they can hang to dry. The charming designs laser-engraved into the wood aren’t just there aesthetically; they allow for air to flow through the socks for thorough drying in a reasonable amount of time.
Tell us:
What are your favorite blocking tools?
Do you block your socks?
Do you have any tips or tricks you’d like to share with us?
Thanks so much for knitting with us!
xo
Melissa
6 Comments. Leave new
I block my socks on blockers I made from wire hangers. They work great, found how to on google.
Thank you for the tips. Have a great day!
I block my socks on blockers I made from wire hangers. They work great, found how to on google.
Thank you for the tips. Have a great day!
What a great idea!
I also made my own blockers out of wire hangers. http://www.knitsinbydenine.com/2017/03/diy-sock-blockers.html?m=1
Great article. I do block mine, no matter what the pattern, but I find it especially important when I’m combining several stitch patterns.
Yes, absolutely so important with multiple stitch patterns! Thanks for weighing in, Deb! We’re two of your biggest fans!